604.763.4307


Use of Cloth Face Coverings to Help Slow the Spread of COVID-19

Under Great Read


Written by

Written on April 21st, 2020

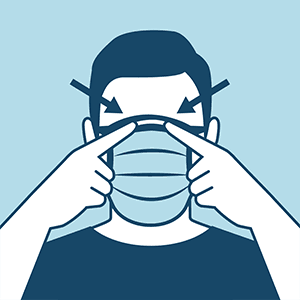
How to Wear a Cloth Face Covering

Side view of an individual wearing a cloth face covering, which conceals their mouth and nose areas and has a string looped behind the visible ear to hold the covering in place. The top of the covering is positioned just below the eyes and the bottom extends down to cover the chin. The visible side of the covering extends to cover approximately half of the individual’s cheek.

Cloth face coverings should—

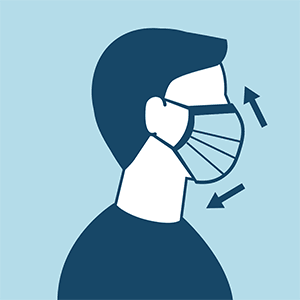
  • fit snugly but comfortably against the side of the face
  • be secured with ties or ear loops
  • include multiple layers of fabric
  • allow for breathing without restriction
  • be able to be laundered and machine dried without damage or change to shape

CDC on Homemade Cloth Face Coverings

CDC recommends wearing cloth face coverings in public settings where other social distancing measures are difficult to maintain (e.g., grocery stores and pharmacies), especially in areas of significant community-based transmission.

CDC also advises the use of simple cloth face coverings to slow the spread of the virus and help people who may have the virus and do not know it from transmitting it to others.  Cloth face coverings fashioned from household items or made at home from common materials at low cost can be used as an additional, voluntary public health measure.

Cloth face coverings should not be placed on young children under age 2, anyone who has trouble breathing, or is unconscious, incapacitated or otherwise unable to remove the mask without assistance.

The cloth face coverings recommended are not surgical masks or N-95 respirators.  Those are critical supplies that must continue to be reserved for healthcare workers and other medical first responders, as recommended by current CDC guidance.

Frontal view of an individual wearing a cloth face covering. Individual is using two fingers to point to either side of the top of the nose, indicating that the covering fits well in this area.

Should cloth face coverings be washed or otherwise cleaned regularly? How regularly?

Yes. They should be routinely washed depending on the frequency of use.

How does one safely sterilize/clean a cloth face covering?

A washing machine should suffice in properly washing a face covering.

How does one safely remove a used cloth face covering?

Individuals should be careful not to touch their eyes, nose, and mouth when removing their face covering and wash hands immediately after removing.

Sew and No Sew Instructions

Sewn Cloth Face Covering
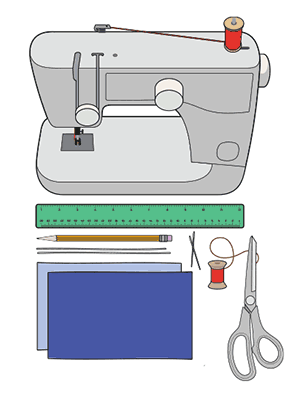
Supplies needed to create a cloth face covering are displayed. The supplies pictured include: one sewing machine, one twelve-inch ruler, one pencil, two six inch pieces of elastic string, two rectangle pieces of cotton cloth, 1 sewing needle, 1 bobby pin, 1 spool of thread, and 1 pair of scissors.

Materials

  • Two 10”x6” rectangles of cotton fabric
  • Two 6” pieces of elastic (or rubber bands, string, cloth strips, or hair ties)
  • Needle and thread (or bobby pin)
  • Scissors
  • Sewing machine

Tutorial

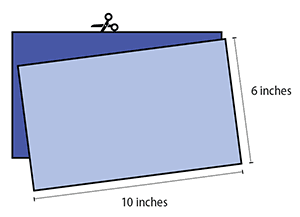
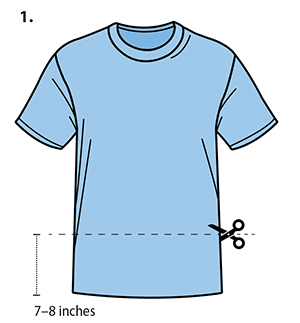
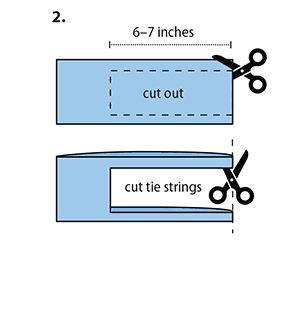
1. Cut out two 10-by-6-inch rectangles of cotton fabric. Use tightly woven cotton, such as quilting fabric or cotton sheets. T-shirt fabric will work in a pinch. Stack the two rectangles; you will sew the mask as if it was a single piece of fabric.

A close up of the two rectangular pieces of cloth needed to make a cloth face covering is shown. These pieces of cloth have been cut using a pair of scissors. Each piece of cloth measures ten inches in width and six inches in length.

2. Fold over the long sides ¼ inch and hem. Then fold the double layer of fabric over ½ inch along the short sides and stitch down.

The top diagram shows the two rectangle cloth pieces stacked on top of each other, aligning on all sides. The rectangle, lying flat, is positioned so that the two ten inch sides are the top and the bottom of the rectangle, while the two six inch sides are the left and right side of the rectangle. The top diagram shows the two long edges of the cloth rectangle are folded over and stitched into place to create a one-fourth inch hem along the entire width of the top and bottom of the rectangle. The bottom diagram shows the two short edges of the cloth rectangle are folded over and stitched into place to create a one-half inch hem along the entire length of the right and left sides of the face covering.

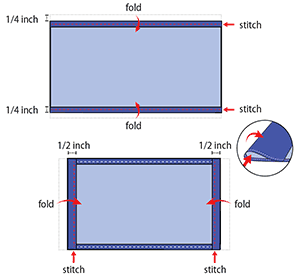
3. Run a 6-inch length of 1/8-inch wide elastic through the wider hem on each side of the mask. These will be the ear loops. Use a large needle or a bobby pin to thread it through. Tie the ends tight.
Don’t have elastic? Use hair ties or elastic head bands. If you only have string, you can make the ties longer and tie the mask behind your head.

Two six inch pieces of elastic or string are threaded through the open one-half inch hems created on the left and right side of the rectangle. Then, the two ends of the elastic or string are tied together into a knot.

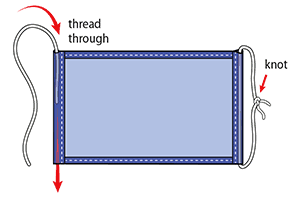
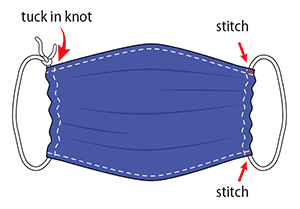
4. Gently pull on the elastic so that the knots are tucked inside the hem. Gather the sides of the mask on the elastic and adjust so the mask fits your face. Then securely stitch the elastic in place to keep it from slipping.

The diagram displays a completed face covering, in which the knots of the elastic strings are tucked inside the left and right hems of the mask and are no longer visible. The cloth is slightly gathered on its left and right sides, and additional stitching is added to the four corners of the gathered cloth rectangle, at the points where the cloth and the elastic or string overlap in these corners.

Quick Cut T-shirt Face Covering (no sew method)

Materials

  • T-shirt
  • Scissors

Tutorial

A front view of a T-shirt is shown. A straight, horizontal line is cut across the entire width of the T-shirt, parallel to the T-shirt’s waistline. Using a pair of scissors, the cut is made approximately seven to eight inches above the waistline. Both the front and back layer of the T-shirt are cut simultaneously.
The rectangle piece of cloth that has been cut from the bottom portion of the T-shirt is shown, lying flat. The rectangle is positioned so that the cut that was just made across the entire width of the shirt is the top side of the rectangle while the original waistline of the T-shirt is the bottom side of the rectangle. From the top right-hand corner of the rectangle, the scissors are moved down approximately one-half inch, along the right, hemmed side of the rectangle. From this point, a six to seven-inch, horizontal cut is made through both the front and back side of the cloth, parallel to the top of the rectangle. The scissors then turn ninety-degrees to cut downward, a vertical line that is parallel to the left side of the rectangle; this cut continues downward until it reaches approximately one-half inch above the bottom of the rectangle. The scissors then turn ninety-degrees again to create another six to seven-inch, horizontal cut that runs parallel to the bottom of the rectangle, back towards the right, hemmed side of the shirt, and cuts through the right, hemmed side of the rectangle. This newly cut out piece of cloth is laid to the side. To cut tie strings, the two remaining slivers of the right side of the rectangle are cut vertically along the hem.
The final piece of cloth is unfolded and worn by an individual. The middle of the cloth piece is positioned to cover the nose and mouth area. The four thin pieces of cloth act as tie strings to hold the cloth face covering in place. The strings around neck, then over top of head are tied into knots.

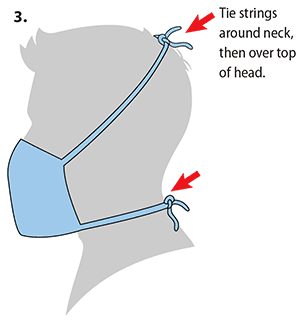
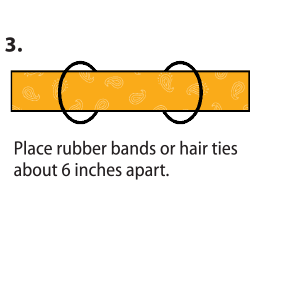
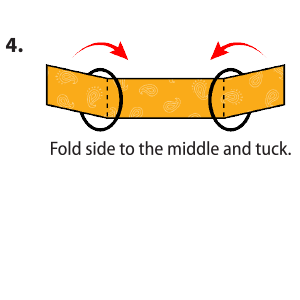
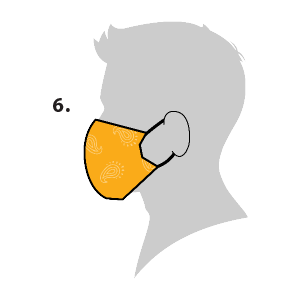
Bandana Face Covering (no sew method)

Materials

  • Bandana (or square cotton cloth approximately 20”x20”)
  • Rubber bands (or hair ties)
  • Scissors (if you are cutting your own cloth)

Tutorial

A single coffee filter is shown lying flat, with the curved edge at the top. Cut coffee filter in half with a horizontal line.
The square bandanna is shown lying flat. The bandanna is then folded in half, bringing the top edge of the bandanna to meet the bottom edge of the bandanna.
The top half of the coffee filter, with the curved edge at the top, is placed in the center of the folded bandanna. Then, fold filter in center of folded bandanna. Fold top down. Fold bottom up, to cover the filter entirely.
Insert the folded bandana, with the filter inside, through the center of two rubber bands or hair ties. Place rubber bands or hair ties about 6 inches apart.
Take the left side and the right side of the bandanna and fold each side to the middle and tuck the sides into each other.
The bandanna should now be a continuous, cloth loop since the left and right sides have been tucked into each other.


CDC LINK